Making jewellery is a complex task involving various procedures and skills. The basic manufacturing process consists of Ring Design > Casting > Hallmarking > Mounting > Finishing.
The vast majority of our jewellery is made using the lost wax casting process, this is the technique used for creating an exact replica of a master design.
A more detailed explanation of the manufacturing process can be found below:
Design & Mould Stage
- It all starts with either a handmade jewellery design (usually in brass or silver) or a 3D CAD (computer-aided-design) design. The CAD design will also need to be built into a life-size model by using 3D Printing or other rapid prototyping machine,
- Once the prototype is built, the next stage is to create a rubber or silicone mould around the prototype. After the mould has set it will leave an exact impression of the original prototype, and thus enabling the ability to create numerous replicas of the original design (in any metal that is required).
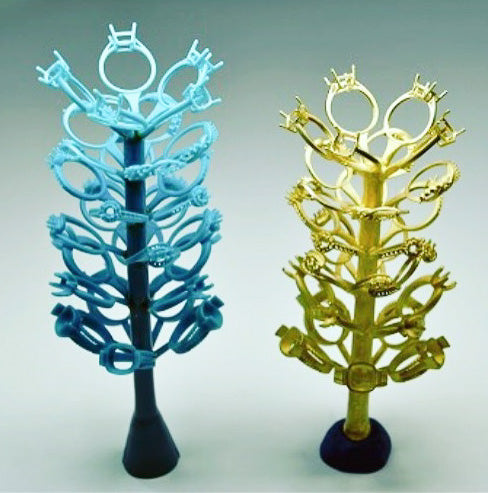
Waxing Up
- Using the completed mould, a wax replica can now be produced. To create the replica, hot wax is injected into the mould and allowed to set. Once set, the wax can carefully be removed from the mould and checked for defects such as shrinkage and air bubbles.
- The approved wax replica will then be grouped together with other waxes that are to be cast in the same metal (e.g. 18ct yellow gold).
Casting
- The group of waxes are now placed into a flask, where liquid plaster is then poured over and allowed to set hard. This operation is carried out in a vacuum environment to ensure there is no porosity within the plaster.
- Now the plaster mould has set hard, the wax needs to be removed. The dewaxing process is achieved by steaming the mould and then placing in the furnace for a burnout.
- The plaster mould is now ready for casting with the appropriate metal of choice. This process is carried out in a centrifugal casting machine.
- The preheated mould is placed in the casting machine, the metal (gold etc) is added to the machine where it is melted into its liquid form. Once everything is at the correct temperature, the metal is poured into the mould which is then spun at high speed using centrifugal force – ensuring the metal reaches all parts of the mould.
- Once the casting process is complete the mould needs to be removed to reveal the metal castings within. This is initially done by quenching the mould in water (breaking up most of the plaster material), followed by fine bead blasting and then pickling in a strong acid solution.
- The castings are now un-grouped using strong metal snips, and will be closely inspected for quality checks. Once all of this is complete, the appropriate castings are then assigned to each customer.
Hallmarking
- All castings will be sorted into their appropriate alloys, and then sent off for hallmarking at the Birmingham Assay Office.
Mounting
- This is the stage where your piece of jewellery really starts to take shape. Our goldsmiths will assemble the components required for your piece. For most rings this will involve the shank (the ring part) and the head/collet (ring setting) being soldered together.
- Before any soldering takes place a large amount of pre-finishing (filing/sanding & polishing) is completed, along with making sure the ring is at the correct size.
- Once all soldered up the piece will need to be pickled and cleaned up prior to additional polishing.

Setting
- By this stage the ring is really starting to take shape and look good, and it’s now ready to receive its stones for setting.
- A highly skilled setter will begin by preparing the setting of the ring, of which there are various techniques depending upon the setting style and stone shapes involved.

Finishing
- A final polish is required to remove any slight tool marks left by the setter, along with a clean.
- If required, it’s at this stage that Rhodium plating would be applied to white gold.


